Archive for the ‘Sewing’ Category
Chevron Quilt Part 1
Progress on this quilt is a lot slower than I’d like to admit. Ideally, this quilt should come together quickly. It’s finding the time to get it done that is proving to be difficult. I am determined to get this quilt completed before the weather starts to cool off. Plus, posting progress on the blog gives me a bit of accountability.
Ok.. so here we go..
When we last left off, I was cutting fabric into triangles. I finished that and began arranging the triangles into the chevron pattern I love so much.

I laid out the entire quilt. It gave me an idea of how big the quilt might be and how many triangles I really needed to create the quilt.
Then, I started putting the half-square triangles together.

After sewing them together, I took them to the ironing board to set the seam on press it flat…
I learned a very important lesson from doing this…

The final half-square triangles are smaller than the original square! Ok.. maybe I should have known this, but I didn’t. On the left is the 5in square I created all the triangles with. On the right is the completed half-square triangle that is now a 4.5in square.
It changes things. My original layout of the quilt showed how big the quilt will approximately be. Now, I might have to add extra rows and columns to make it the size I desire.
Good thing I have a lot of extra triangles to play with.
I have to finish sewing all the half-square triangles together before I can decide if I need more. I’m hoping at the next update, I’ll have a better idea of what I’m doing!
I’m doing it again.
I’m making a quilt.
This time, I’m making a traditional quilt, not a rag quilt.
There is A LOT that I don’t know about making a quilt and I probably should have taken a real class at a fabric store, but I feel like I’ve watched enough Youtube videos that I just might be able to pull this off..
When I first got to Joann’s Fabric store, I was overwhelmed. How much fabric will I buy for the quilt top? How much batting will I need? What about the backing fabric and the binding?! I was going a bit crazy and overwhelmed with the entire process that I almost felt like giving up.
I left the store that day feeling very discouraged about the whole thing. However, I still wanted to do the quilt.
So, I decided to just take things one step at a time.
I’m winging it…
I went back to the store and I bought what I needed for the quilt top only.
 I bought half a yard of three different pink fabrics and half a yard of three different blue fabrics. I also bought 2 yards of white fabric. I’m in the process of cutting the fabric into 5 inch squares, and then cutting them on the diagonal to make triangles.
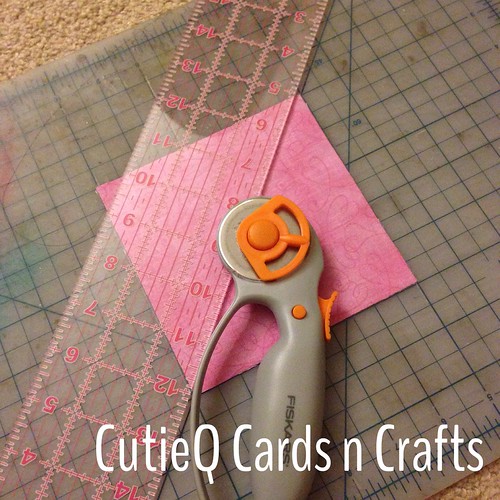
Cutting the fabric is taking me a while since I can only do this at night when the kids are asleep. I’m currently working on cutting the white fabric into the triangles, so I’m almost done. I can’t wait to sew the white and patterned fabric triangles together to make some fun squares!
Follow this blog to follow my quilt making process…
Rag Quilt – Sewing
Posted on: December 18, 2014
Rag Quilt – Part 1, Part 2, Part 3, Part 4
With all the sandwiches done, all that’s left to do is put the quilt together. I have to admit, it was scary.
I was worried that things wouldn’t line up properly. I was worried the squares won’t look like squares once everything was said and done. I was worried that putting it all together was going to much harder than I anticipated. Everything else seemed to go fairly smoothly, I was sure that these final steps were going to be a disaster…
But then again, this was my first time making any sort of quilt. I was going to allow myself imperfections. I was going to consider these all lessons to be learned.
First, the squares have to be arranged in the order they will be sewn together. I had to do this on the floor because I have no table space big enough. Hubby took M out to play in the neighborhood, so I took advantage of the free floor to do it.

You can see I did 5 squares across and 6 squares down. There was no systematic way of arranging them. I just made sure none of the same patterns were directly next to each other, and it was just pleasing to my eye.
Then, I sewed them together, row by row, with a 1in seam allowance to allow for a seam big enough for ragging. I numbered the rows with the left square on the top..

Once the rows were done, it was time to piece them all together. It took a lot of pins and a lot of patience. I definitely feel like a walking foot would help putting this together because there were times that I felt things were shifting because of the way they were feeding through the machine. Still, I made it work with what I had..


I flattened the seams when I was sewing the rows together. I’ve seen other videos where they nest the seams. I’m assuming it’s just whatever your preference is. The edges are going to get cut up in the ragging process anyway, the way the seams were sewn together probably doesn’t matter all that much in the end.
After all the rows had been sewn together, I took the quilt and topstitched a 1in seam aorund the entire quilt’s edge. That was the end of all the sewing!

Here’s a view of the back and the front of the quilt before I started cutting up the edges.
It was a lot easier than I thought it would be…
(Don’t forget to click these badges to rate my blog and vote for me. All you need to do is click!)


Rag Quilt – Sandwiches
Posted on: December 7, 2014
Rag Quilt – Part 1, Part 2, Part 3
After cutting all the batting and all the fabric, the next step is to create sandwiches and sew them together.
A sandwich is two pieces of fabric with the batting in the middle, making sure the “right” side of the fabric is facing outward.
In the case of my solid colored fabric, it didn’t matter what sides were facing out. In my printed fabrics, I had to make sure the printed sides were out AND in the same orientation.

Once the sandwiches are assembled, I pinned them on the corners and the middle to make sure nothing shifted too bad during the sewing process.

Take it to the sewing machine and sew a big X down the middle. As you can see in the photo, I didn’t start at the edge of the fabric. I estimated an inch in from each corner before sewing. In hindsight, I think I will start a little closer to the edge, still not all the way to the edge, but just closer. At first my sandwiches looked a little rough. It was my first time, so I expected it not to be perfect. But by the time I finished all 30 squares, my sandwiches looked pretty decent. Practice does make perfect.
Some of my squares didn’t lay on top of each other perfectly, but I figured it was ok. The edges were going to be “ragged” at the end of all this sewing, so that would hide a lot of the imperfections during my cutting of the fabric.

Halfway through sewing all the sandwiches together.

Here are all 30 completed sandwiches. Once I got the hang of it, this process went by pretty quickly. It took me about two days to do this since I had to squeeze in the time between naps and stuff.
Progress on this quilt has been quicker and easier than I initially anticipated and I’m loving every bit of it!
The next step is to arrange the quilt and to start putting it all together!
(Don’t forget to click these badges to rate my blog and vote for me. All you need to do is click!)
Rag Quilt – Batting
Posted on: December 2, 2014
After getting all the fabric cut to size, the next step was to cut the batting.
The instructions said to cut the batting into 7in squares.
I have to say, this wasn’t my favorite step at all. My cutting space is limited to the fact that I have a small cutting board. Folding up batting to cut isn’t easy. Batting is bulky and fluffy and just hard to work with on a small space.

I ended up just cutting the full sheet (45in x 60in) in half and cutting it with scissors into manageable strips before I used my ruler and rotary cutter.
It wasn’t easy, but I cut 30 of those 7in squares.
 It took me about two nights to do this since it took awhile to figure out how to manage it the first night. Once I figured it out, it went pretty fast.
Next is to assemble the “sandwhiches” and sew them together…
(Don’t forget to click these badges to rate my blog and vote for me. All you need to do is click!)
Rag Quilt – Cutting the fabric
Posted on: November 24, 2014
I cut the fabric earlier this week.
It was my very first time cutting fabric and I have to tell you, Youtube makes it look easy.
It may have been my supplies.

I’m using a fairly small cutting mat. It’s the one that I use for my papercrafting. I’m not using one of those flat rulers that you can find in the fabric section of a craft store. That ruler used to be my brother’s, who used it during his college art days. The only thing “fabric crafting” that I purchased for this project was that rotary cutter.
My cuts weren’t perfect like they looked on YouTube, but once I realized that I would eventually be “ragging” the edges, I was ok with a little imperfection.
It took about two different days to get all the fabric cut into 9 inch squares.

I made 14 squares of these two colors. Sorry the color is off. It was evening when I cut them and I had to depend on the lamp in our house.

I made 16 squares of each of these patterns.
The next item I have to cut is batting.
Then, I start to sew!
(Don’t forget to click these badges to rate my blog and vote for me. All you need to do is click!)
Rag Quilt
Posted on: November 21, 2014
I have to admit, since I’ve been off of work, I’ve been itching to do something super crafty..
A few months ago, I was lucky enough to inherit a sewing machine from one of Hubby’s friends that were moving.
A sewing machine is a total foreign machine to me. I had NO idea what anything was. Luckily, my aunt was over for the week and she taught me all the basics. She even talked me through sewing a small pillow case!

After that brief lesson on basics, I’m pretty determined to tackle quilt making.
Yes. Quilt making.
I’ve been obsessed with this particular rag quilting Youtube video:
Seems pretty basic enough, right?
So, I dragged Hubby to Joann’s and we went to get the basics. Fabric, batting, rotary cutter, and thread. Everything else, I think I have or can make useful.

Those are the fabric patterns I plan to work with.
I also plan to record my progress on this blog. Hubby seems to think I may have a few meltdowns during the process. He’s probably right. I hope I can finish before the baby is born. If I finish this, I plan to make one for M too.
Have you made a rag quilt before? Please tell me it’s as easy as it looks!!!
(Don’t forget to click these badges to rate my blog and vote for me. All you need to do is click!)


